Hello there everyone!!
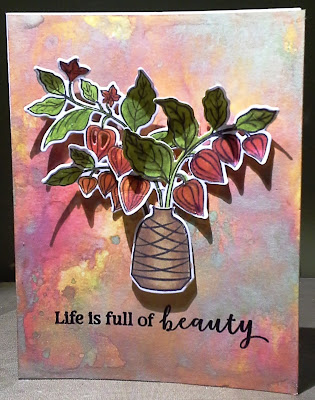
Autumn is in full swing and I just can't get enough of those wonderful array of fall colors! Today I am creating background using Distress Oxide inks: Fossilized Amber, Firebrick, Pealed Paint and Marmalade. I used mixed media paper but you can use thick watercolor paper as well. I would not use a regular card stock for this technique.
You start off by taking the ink pad and run lines of ink on a non-porous surface. We are using 4 colors to so create 4 lines of ink. Give it a spray of water. Take your paper and run thru it. It will look like one big mess but don't you worry, it shall be OK. Grab a heat gun and dry it, then dunk it in the ink again, dry it, add more ink and so on and so forth. You can also spray the paper with water as well to create more controlled spots. See how it is done on the video below:
Once my background was done I embossed the greeting from MMH September 2018. I also stamped, colored and die cut the stamps from that same set. I used copics for the coloring but you can use distress oxides and a brush to achieve similar effect. I attached branches by putting glue on the back of the stems only, which allows me to add 3D to the leaves and flowers by curling the ends with a pencil. You can also add small pieces of foam to help it stay up just as I did with the vase. Oh yeah, I added some glitter pen to the flowers themselves just because I could.
Here is a different background I created using the same colors. You will never get the same background using this technique no matter how hard you try. I don't like to show shadows on the cards if I can help it but in the picture below they actually help to see how the branches look on paper and the 3D effect I was trying to achieve.
Enjoy the project!


What a gorgeous card! I love that background!
ReplyDeleteThis is beautiful - that background is fantastic. Thanks so much for joining us at The Card Concept.
ReplyDeleteWhat a beautiful card! Love the background as well as the coloring of your main image- great job! Thanks for sharing with us at The Card Concept and we hope you can join us again soon!
ReplyDelete